All about event propagation in JavaScript!

Event propagation
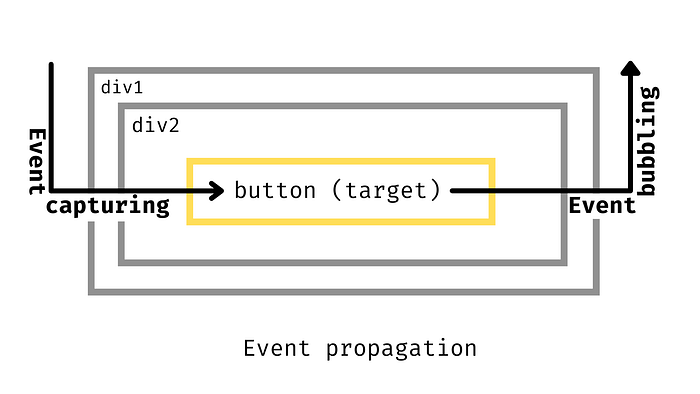
Event propagation defines how the event propagates through the DOM tree. Below is the DOM tree for a small HTML page. So, if we click on the button i.e ( click event ) so event propagation mechanism defines how this click event propagates (up and down )through this DOM Tree.

Phases of Event Propagation
- Event Capturing phase
- Target phase
- Event bubbling phase
Before understanding Event Capturing, let’s first understand the third phase i.e Event bubbling phase.
Event Bubbling phase
In this phase, all the events in the child node automatically bubble up to its parent nodes. If the element where the event occurred and the parent/ancestor elements have the event handlers for that event, those parent/ancestor event handlers will also execute in this phase. By default in all modern browsers, almost all events are registered in the bubbling phase. You may find some events like focus, blur,load, and unload are not registered for the bubbling phase.
Let’s see an example to better understand.
⚫ index.html<!DOCTYPE html>
<html lang="en">
<head>
  <title>Event Propogation</title>
</head>
<body>
  <div id="nav"></div>
  <div id="div1">
    <div id="div2">
      <div id="div3">
        <button>Know more</button>
      </div>
    </div>
   </div>
  <script src="script.js"></script>
</body>
</html>
Below is the script file,
⚫ script.jsconst html = document.querySelector("html");
const body = document.querySelector("body");
const nav = document.querySelector("#nav");
const div1 = document.querySelector("#div1");
const div2 = document.querySelector("#div2");
const div3 = document.querySelector("#div3");
const button = document.querySelector("button");button.addEventListener("click", () => {
  console.log("button clicked");
});div3.addEventListener("click", () => {
  console.log("div3 clicked");
});div2.addEventListener("click", () => {
  console.log("div2 clicked");
});div1.addEventListener("click", () => {
  console.log("div1 clicked");
});nav.addEventListener('click',()=>{
  console.log('nav clicked');
});html.addEventListener('click',()=>{
  console.log('html clicked');
});body.addEventListener('click',()=>{
  console.log('body clicked');
});
DOM Tree of the HTML looks like this,

When the button is clicked following messages are logged:
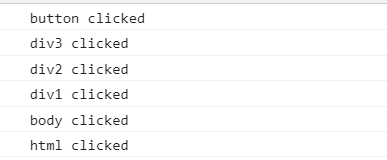
The following happens on clicking the button :
- button click event handler is executed
- After that parent of the button, i.e div3 click event handler is executed
- Then its ancestors from bottom to top i.e div2,div1, body, and Html click event handler is executed
- The event handler of the div with id as nav is not executed as it does not count as its ancestor.
You can experiment with the code by removing the click event handler of the button, you will find that its parent and ancestors event handlers are called.
Use case of event bubbling:
If you want to attach an event handler to elements that are dynamically added so it is better to attach an event handler to the parent element rather than binding event handlers to individual elements which will be a tedious task. Then apply required manipulation over the target element by fetching it with the event.target. This is referred to as Event delegation which takes the advantage of bubbling phase.
A popular real-life example is while making a TODO app where the list of items is dynamically added by the user. If you want to add strike or change color or hide the completed item, it's better to have an event handler on the parent element. Event bubbling will take care of bubbling up of the event to the parent element and can handle required manipulation on the target element. Let’s see an example,
⚫ index.html<!DOCTYPE html>
 <html lang="en">
 <head>
  <title>Document</title>
  <link rel="stylesheet" href="style.css">
 </head>
 <body>
  <div id="add-item">
   <input type="text" id="item">
   <button>Add item</button>
  </div>
  <ul class="todo-list">
  </ul>
  <script src="script.js"></script>
 </body>
 </html>
Below is the script.js file
⚫ script.jsconst button = document.querySelector('button');
const input = document.querySelector('input');
const list = document.querySelector(".todo-list");button.addEventListener('click',()=>{
  const li = document.createElement('li');
  li.classList.add('not-complete');
  li.innerText = input.value;
  input.value = '';
  list.appendChild(li);
});list.addEventListener("click", (e) => {
 e.target.classList.toggle("completed");
});
Below is the style.css file. I have not added much of the styling to show the functionality part only.
⚫ style.css.not-complete
{
  color:red;
}
.completed {
  color: green;
  font-weight: bold;
  text-decoration: line-through;
}
Working demo of the above code
If in any case, you want to stop the propagation of the event you can call the event.stopPropagation() which will prevent the propagation of the event in these phases.
Target phase
During this phase, the event handler of the target element is executed. This phase occurs when the event.target element is reached. For example, if the button is clicked then the click event handler will be called. This event.target will not change in the propagation phase.
It is important to know the difference between event.target and event.currentTarget . event.target is the element which raises the event. So, in the above code button element is the target element. event.currentTarget is the one that currently handles the event. In the above code, button,div3,div2,div1, etc will one by one become the currentTarget element. In case you use stopPropogation() inside any of the handlers that will be the currentTarget Element.
Event Capturing phase
It's a phase where the event goes down from the top of the element ( parent/ancestor elements) to the target element. There is a capture parameter in the event handlers that takes a boolean value. By default it's false. To make the event handlers capturer, you have to pass a value as true.
Let’s understand with the code.
HTML code is the same as above. And below is the script.js file.
⚫ script.jsconst div2 = document.querySelector("#div2");
const div3 = document.querySelector("#div3");
const button = document.querySelector("button");
button.addEventListener("click", () => {
  console.log("button clicked");
});
div3.addEventListener("click", () => {
  console.log("div3 clicked");
},true);div2.addEventListener("click", () => {
  console.log("div2 clicked");
},true);
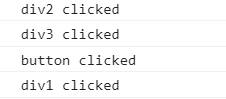
The above code will log,
div2 clicked
div3 clicked
button clicked
As discussed, event handlers of the parent element are executed, and thereafter the event handler of the target element is executed.
In addition to the capture event handlers, if you also have non-capture event handlers then that will be executed as below,
⚫ script.jsconst div1 = document.querySelector("#div1");
const div2 = document.querySelector("#div2");
const div3 = document.querySelector("#div3");
const button = document.querySelector("button");button.addEventListener("click", () => {
  console.log("button clicked");
});div3.addEventListener("click", () => {
  console.log("div3 clicked");
},true);div2.addEventListener("click", () => {
  console.log("div2 clicked");
},true);div1.addEventListener("click", () => {
console.log("div1 clicked");
});
The event propagation phase has the following order :
capturing ➡target ➡bubbling
Hence first the capturer event handlers are executed then the target phase and then the event handlers which are non-capturers.
You can check the phases with the help of event.eventPhase which returns number (1,2,3) where 1 denotes capturing,2 denotes target and 3 denotes bubbling.
Use case of capturing
As we discussed in the use case of the bubbling section that event delegation takes the help of it. But there are events like focus which is not registered for the bubbling phase hence event capturing is helpful for these events in event delegation.
Let's see an example to understand.
⚫ index.html<!DOCTYPE html>
 <html lang="en">
 <head>
  <title>Event Propogation</title>
 </head>
 <body>
   <div id="nav"></div>
   <div id="div1">
    <div id="div2">
     <div id="div3">
      <button>know more</button>
      <input type="text"/>
     </div>
    </div>
   </div>
   <script src="script.js"></script>
 </body>
 </html>⚫ script.jsconst div2 = document.querySelector("#div2");
const div3 = document.querySelector("#div3");div3.addEventListener("focus",() => {
  console.log("div3 focus");
},
true);
div2.addEventListener("focus", () => {
  console.log("div2 focus");
});
On focusing on the input, you will get div3 focus , as a log statement.div2 focus will not be logged as it is not registered in the bubbling phase.
Hence, let's say in the cart items you have an input to change the quantity of the individual items. There if you implement event delegation you can use the event capturers for such events.
Finally, we came to the end of the blog and I hope you understood. See the below picture once to recall the event propagation,
TL;DR
- About Event propagation
- Phases of Event propagation
- All about the third phase: Event bubbling
- All about the second phase: Target phase
- All about the first phase: Event capturing
Thank you✨✨
Happy coding !!
